By Declan Whaley-Sharp, edited by Caroline Field
Not since the internet’s conception has man made something so practically useful and simultaneously infuriating as the Sidus Link application, a cinematic lighting design application for lighting systems in filmmaking.
If you’ve spent any time with Aputure lights, you’ve probably heard of the Sidus Link App, and you’re here because it may be a tiny bit difficult to understand. So, because it’s a painfully slow day at the office, I’ve decided to write an abridged user’s guide to highlight its many uses and problems. Let’s get started on this walkthrough!
Getting Started
We’re using an Aputure Nova and a normal Apple iPad to go through this guide with the free version of the Sidus Link application, which should cover just about every setting available. If you’re using anything other than an Aputure Nova, the light you are using may have fewer options if their color cannot be changed, but overall the setup is the same for every light system you may be using.
So what are your first steps?
-
**Download the correct Sidus Link app **(for iPad) (unless you’re controlling the lights from your phone, in which case download this version of the app ).
-
Set up an account with your email and phone number.
-
After logging in, you’ll be greeted with this screen (minus the studio scene)
This is your lighting control system panel where you’ll spend the bulk of your time. We’ll talk about this panel shortly, but first, let’s walk through all of the mostly useless tabs.
The Mostly Useless Tabs
After you’ve logged into the app, you’ll want to press the three lines in the top left corner. Unless of course, you try logging into the FREE app from multiple different places, in which case you’ll be kicked from the FREE app instantly, which did happen to me while writing this post. After you press those three lines, this menu will appear.

-
**Lighting Control System: **The one tab you’ll actually use, this is where you control the lights (more on that later).
-
Diagram Master: Only accessible with the paid version, this panel lets you draw light diagrams with custom icons. Kind of like any free drawing program.
-
CC Group: This page allows you to share your scenes with other users, so multiple people can control lighting. Only three collaborators are allowed in the free version.
-
**Inbox: **Useless.
-
**Support: **A place to access FAQs, Sidus contact information, and a user guide riddled with typos and written entirely in the past tense.
The Lighting Control System Tab
The lighting control system panel is pretty complicated, so we’ll break it down into subcategories.
Scenes:
- All light fixtures are controlled within their respective scene. To make a new scene, simply press either of the below buttons.
Once you have your scene, you can click on these three dots to perform these below functions:
FUNCTION DESCRIPTIONS:
-
Rename: Renames
-
Delete: Deletes
-
Collaborate: Allows you to add a scene to your CC group, if you have one, so multiple users can control lighting.
- Temporary share: Generates a code people can input and control lighting temporarily
Temporary share: Allows you input a temporary share code.
- Collaborated: Shows scenes accessible through your CC group.
Adding fixtures:
-
Connect to your Wi-Fi network.
-
Go to your Aputure light, navigate through the menu to BT/bluetooth reset, click yes and let it load.
Note: Occasionally the BT reset will fail and aperture customer support has no idea how to fix it. Unplug and plug it back in does the trick.
- In the Sidus Link app press the green plus mark to add a fixture, located in the center of the screen if you’ve made a new scene, or the top right of the screen if you already have fixtures. (Note the red circle on the top right of the picture below for that)
The fixture should pop up after waiting briefly, click it and you should be good to go.
Light controls:
Ok, finally, the good stuff, we’ll be breaking this down into subcategories.
- Basic control/white mode (little star icon)
Tab 1: CCT [IMAGE 10]
- On the left you’ll see every light within the scene, each one can be controlled separately or you can press the “all fixtures option” and control them all simultaneously. This will be the same for every setting
Note*: For some reason, this setting is only available if every light is still on, if they aren’t, then the option will still be there, but it wont do anything.*
-
In the top right corner, is your switch to turn the lights on and off, this will also be true for every setting.
-
INT: Adjusts the intensity of the lights.
-
CCT: Adjusts the color temperature of the lights (amount of blue vs. orange).
-
**G/M: **Adjusts the amount of green vs. magenta in the color.
-
Graphs: Adjust the rate at which the light’s intensity changes.
-
Linearly: Adjusts the intensity at the same rate as you’re adjusting it with your finger.
-
Exponential: Adjusts the intensity by increasing slowly then shoots up past 80.
-
Logarithmic: The inverse of exponential.
-
S-Curve: Follows an s-curve rate.
-
Standard vs. Expanded: Expanded gives you a wider range in your CCT.
-
K numbers: The numbers on the right side gives you some preset color temperatures to work with.
Tab 2: Source type
- Same basic controls as CCT but with 17 different presets to make your lights have a specific look, such as candle, moonlight, sunrise, etc.
Tab 3: Source match
- This function takes advantage of your phone or iPad’s camera to capture a color temperature from a pre-existing light source, and match the light to it.
Gel mode (the little bars icon)
- CTB/CTO: Similar to the source type setting of white mode, this mode emulates the look of a certain light, specifically Tungsten and daylight and the common gels you would put over a light source (CTB is short for color temperature blue and CTO, color temperature orange).
Gels: Same as CTB/CTO but with every gel color on the planet.
Color Mode (Paint Palette)
- HSI: HSI gives you control of intensity and complete color control. Though if you’d prefer, you can go to the bottom right corner and control it through hue, intensity, and saturation bars.
RGB: This is like HSI, but more restrictive. Gives you control over red, green, and blue sliders.
**XY-CIE Coordinates: **For exact color values, you can input the corresponding number that matches the CIE1931 color system or put specific gamut restrictions on yourself by changing your gamut switch on the left side of the screen.
Picker: If you’re using a device with a camera, Sidus Link can use the camera to pick out a color from your environment and match your fixture to it.
FX Tab (Wand): Alright, here we go, last one, and this is where the magic happens (get it? Cause it’s a wand… my creative wit defies your meek sensibilities!). This tab gives you the ability to apply a variety of effects to your lighting.
System: This page offers 15 different lightning effects, located in the top right corner. Anything as simple as a strobe effect, or as complicated as a “fireworks” this tab will have you covered.
Manual FX: The manual FX page allows you to make your own custom effects, with Sidus’s user manual boasting an impressive 2.312783744647040×1042 number of possible effects. A mathematical formula almost as useful as actually explaining how to make an effect.
Left Column: How the colors of your effect behaves.
- Source base: You can choose if your effect will follow CCT base, allowing you to change color temperature, saturation, G/M, and intensity, or HSI mode, which allows you to change all of the same stuff, while also giving you access to the full color spectrum.
Point vs. Range: With every setting in the left column, other than Source Base, you can choose whether you want the color/intensity to stay at an exact point (point setting) or fall within a range (range setting). On top of that, if you choose “range”, you can pick how you’d like that range to function.
-
Sequential: Varying in that range from minimum-maximum.
-
Reverse: Varying from maximum to minimum.
-
Alternating: Varying from minimum-maximum, then back from maximum-minimum.
-
Random: For when you want a dance party.
Right column: How the effect behaves.
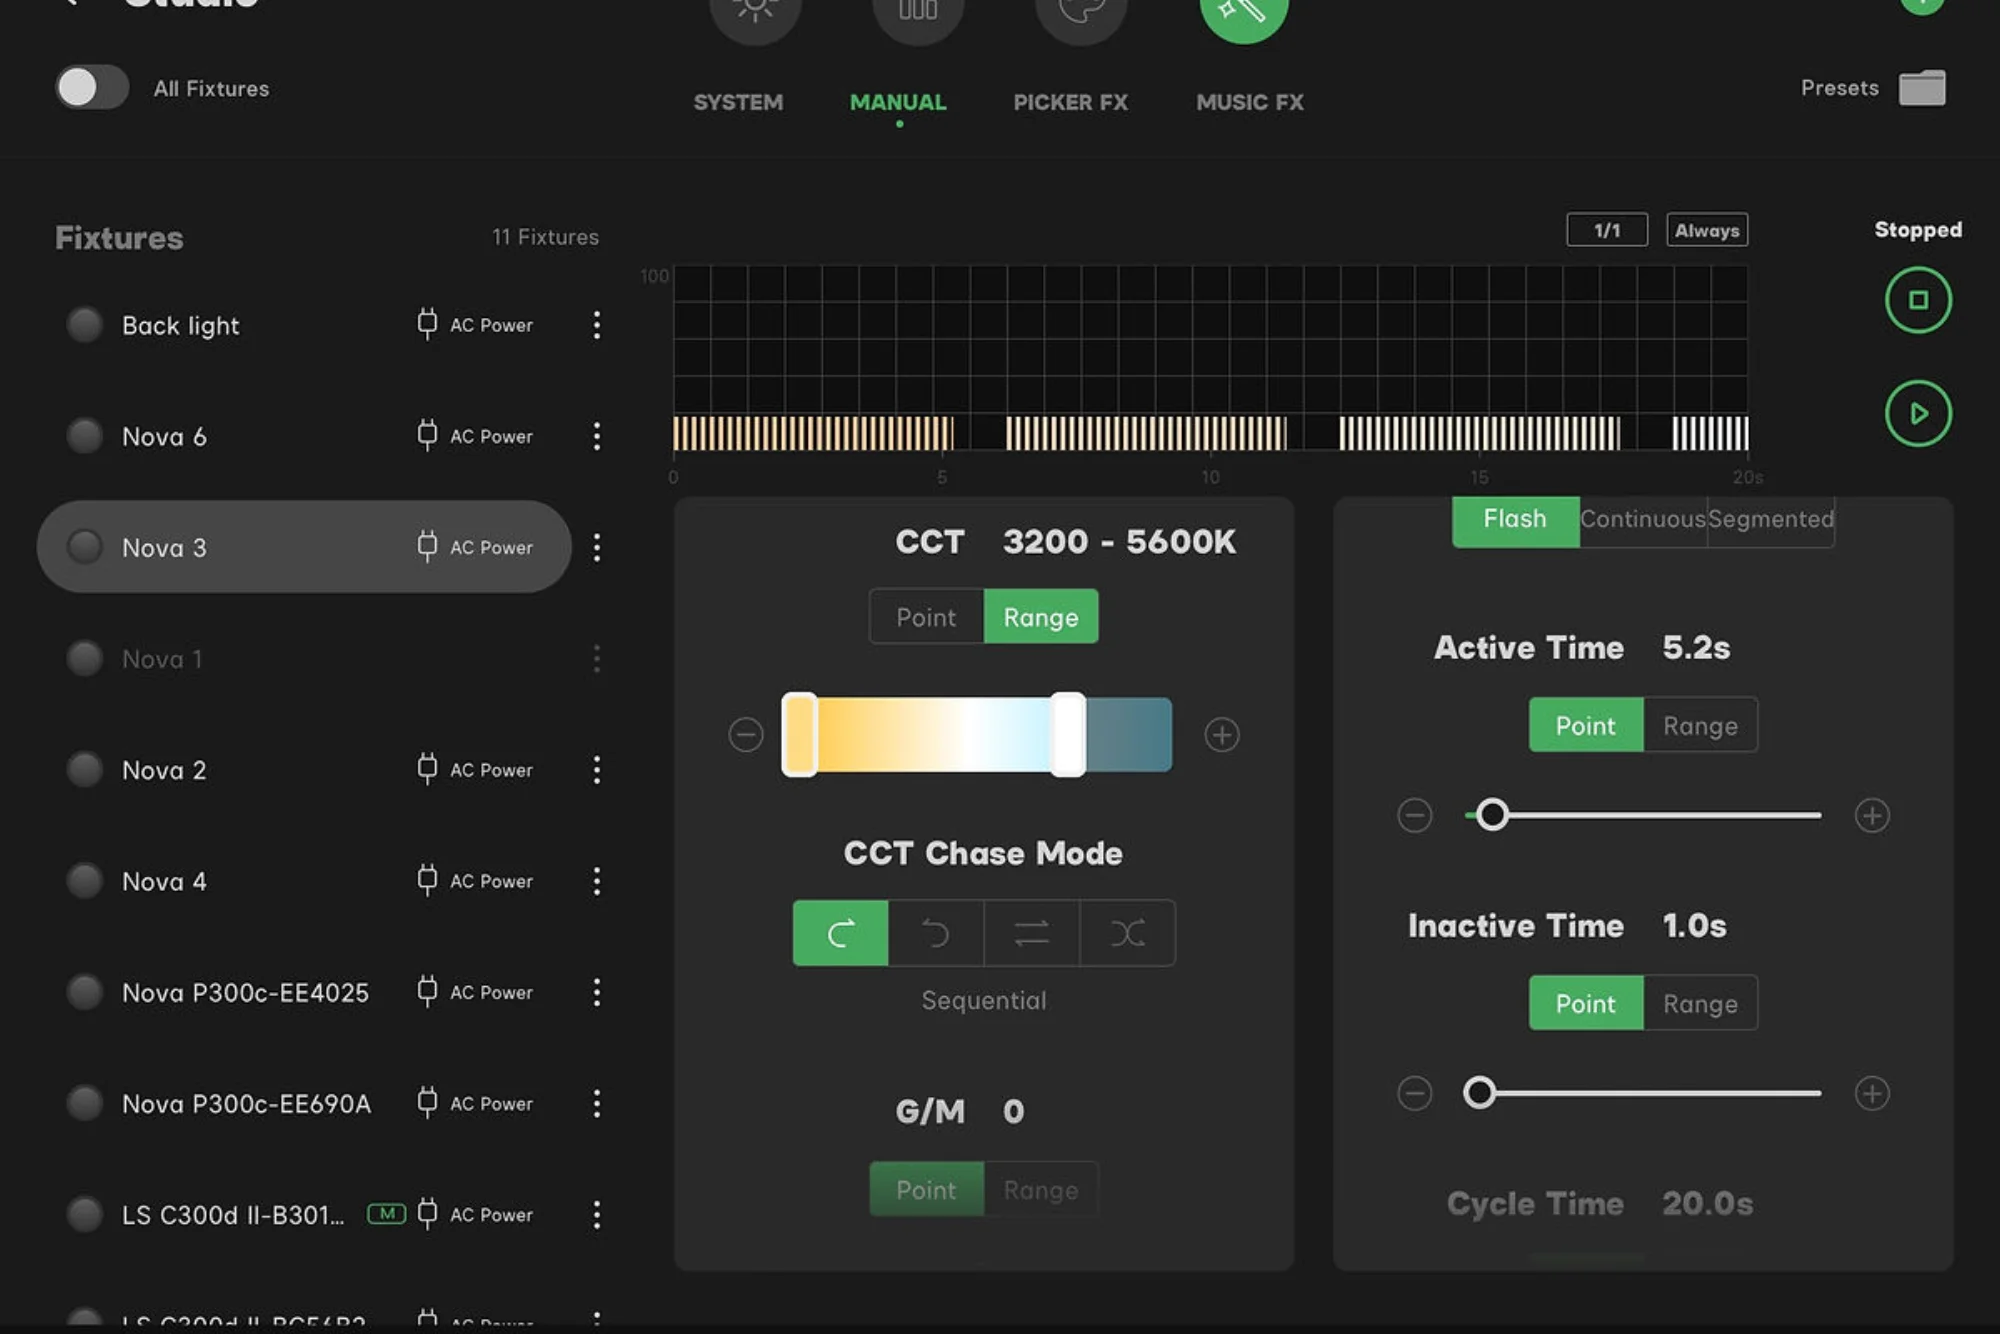
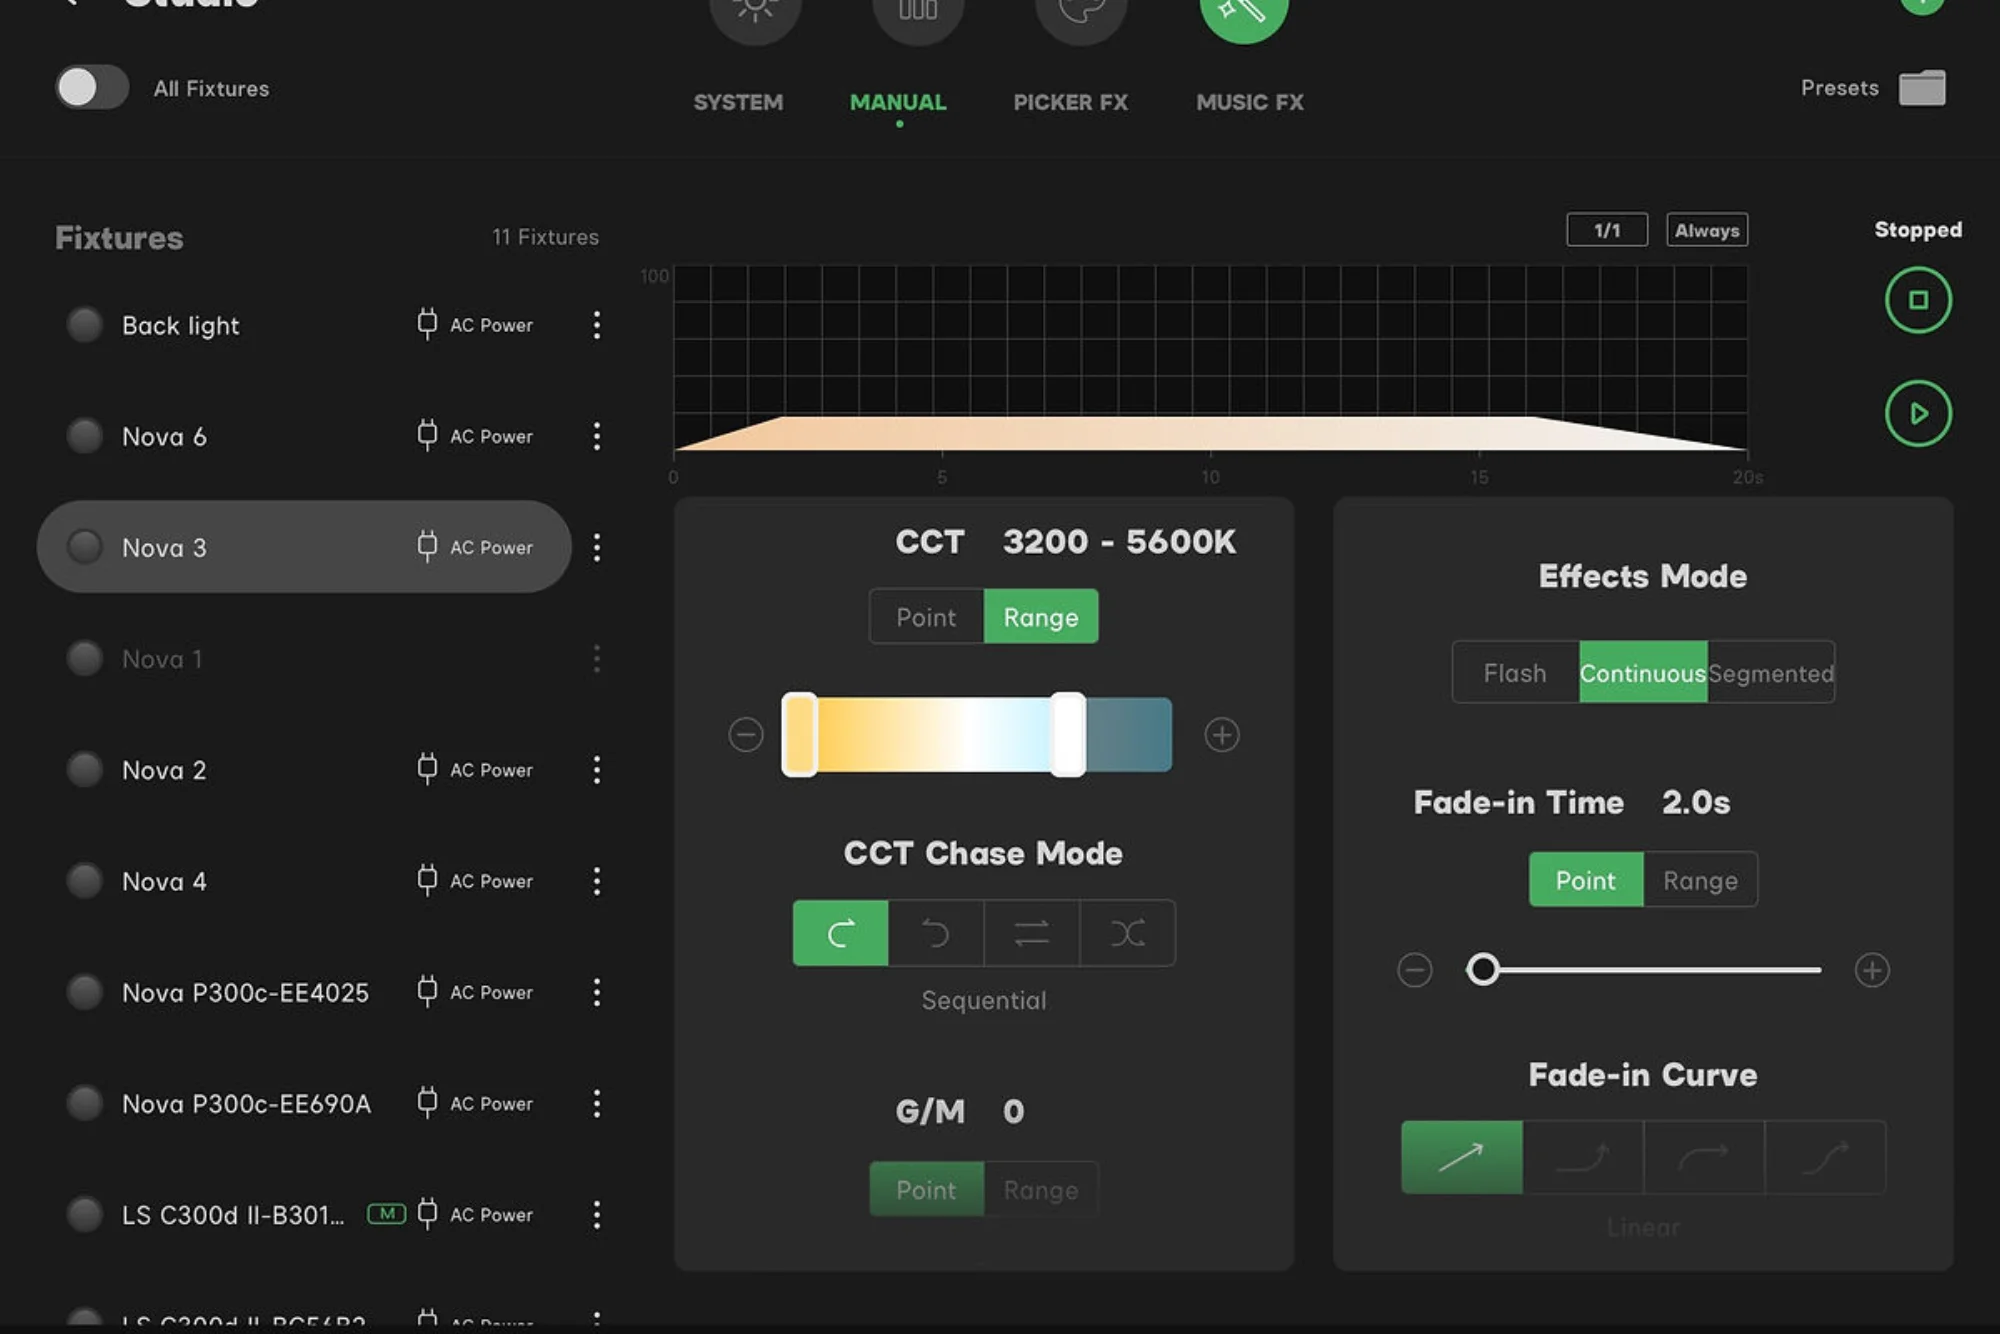
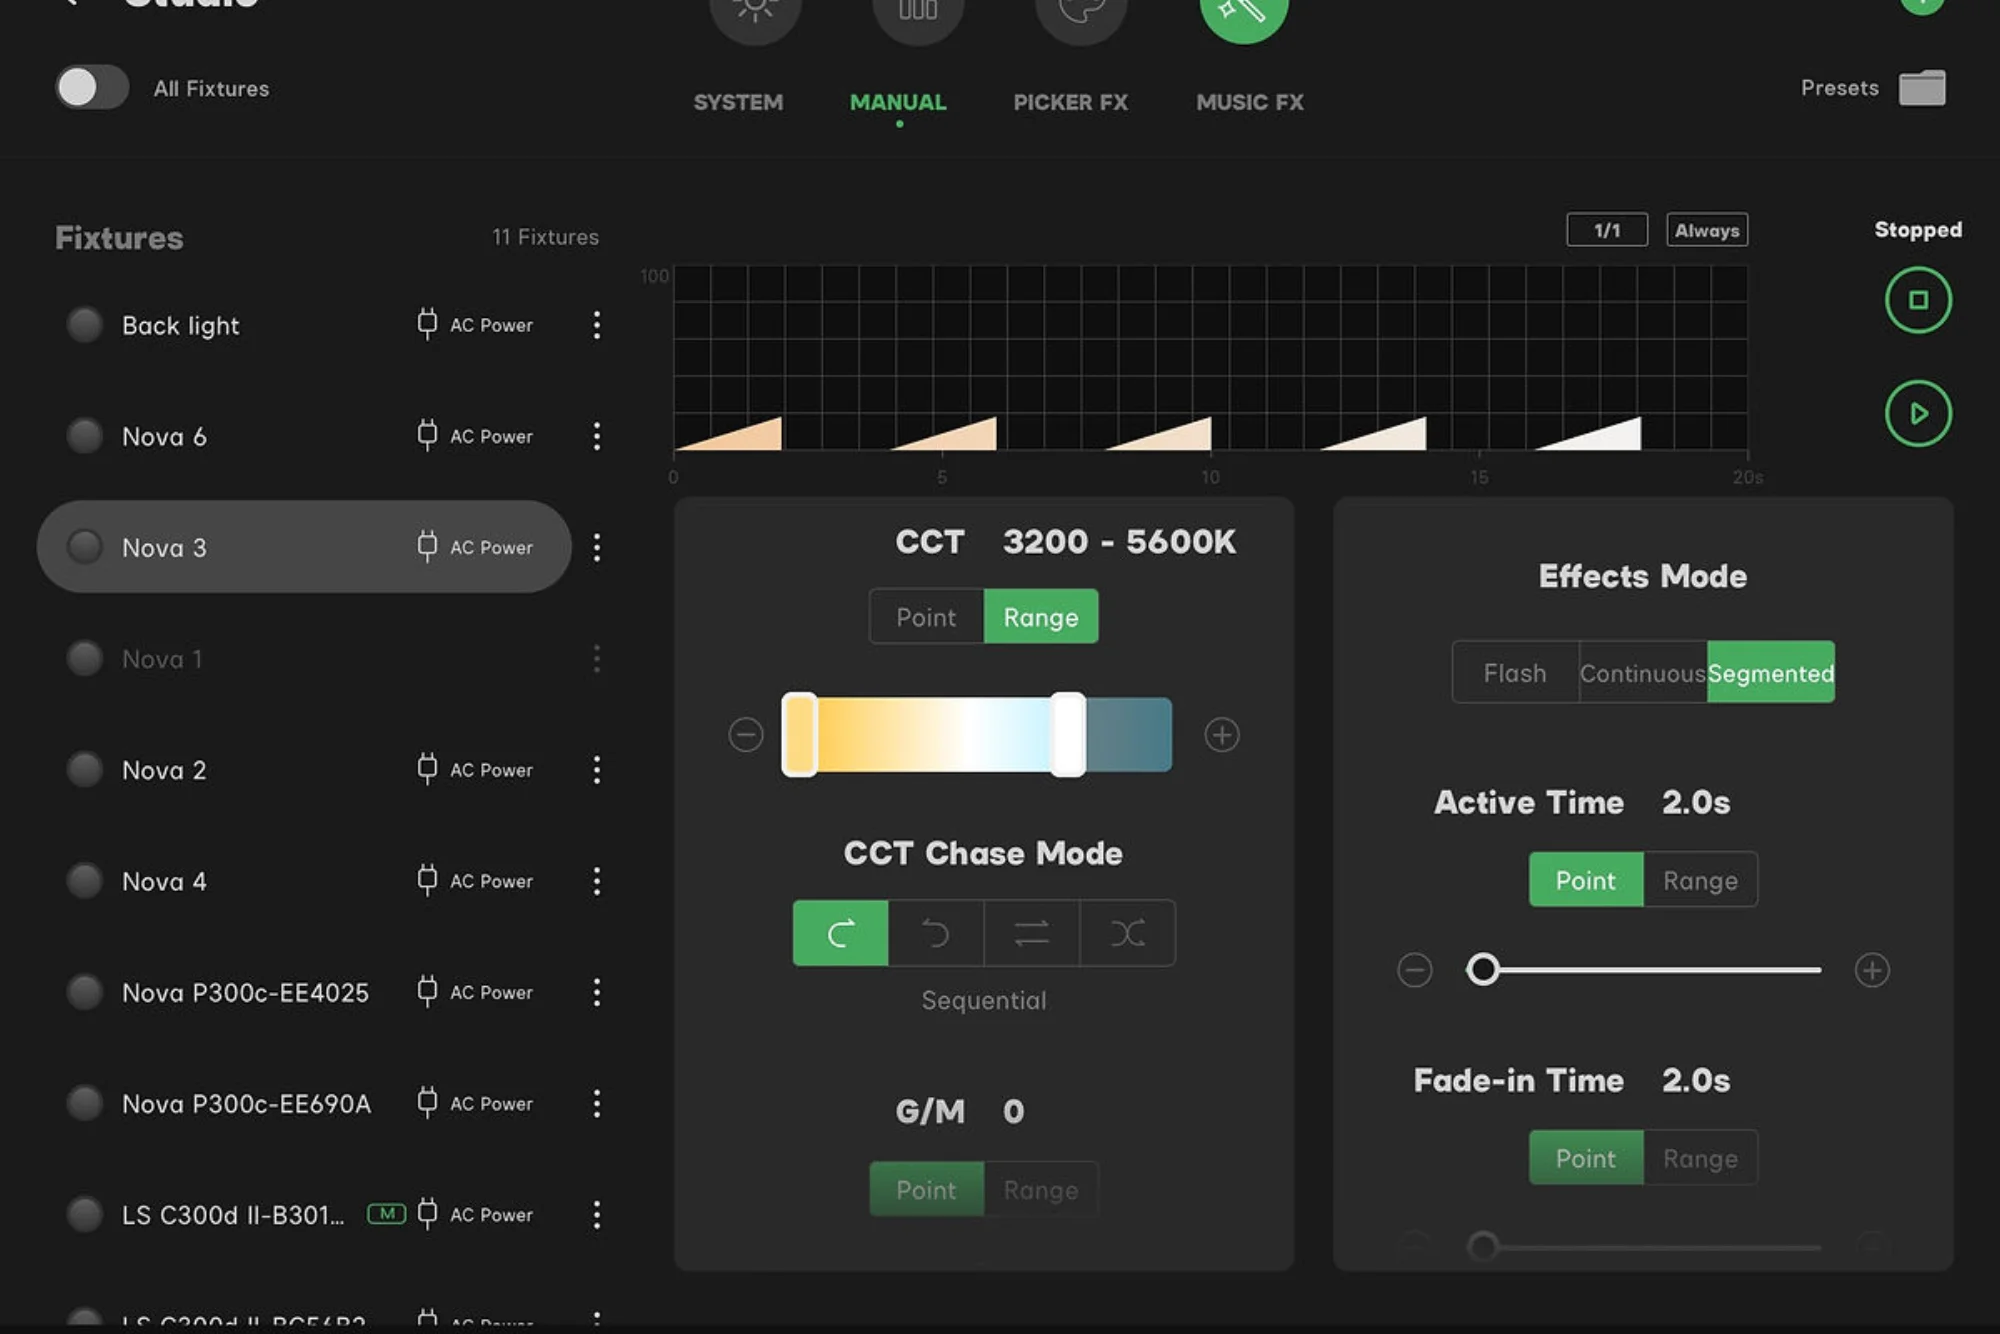
- Effect mode: There are three “types” of effects that are all incredibly customizable. Every mode has its own unique controls, but the details of which can be found in the Sidus Link user manual. I will give a brief overview of each effect type, since the manual doesn’t really understand how human speech works.
Flash mode: Flash mode makes your fixture flash on and off abruptly, as demonstrated in this graph. The Y-Axis is the light’s intensity, the X-axis represents the time. You’ll mainly adjust the duration of time the light is on and off, depending on how much you want it to flicker.
Continuous mode: Continuous mode allows you to set a fade in and fade out time and keeps the light on continuously for the rest of the time. You will mainly adjust how long it takes to fade in/out/how long it will be at its full intensity.
Segmented: Basically the same as flash mode, but it also has the fade controls of continuous mode, in case you want things to fade in and out rather than flash abruptly on and off.
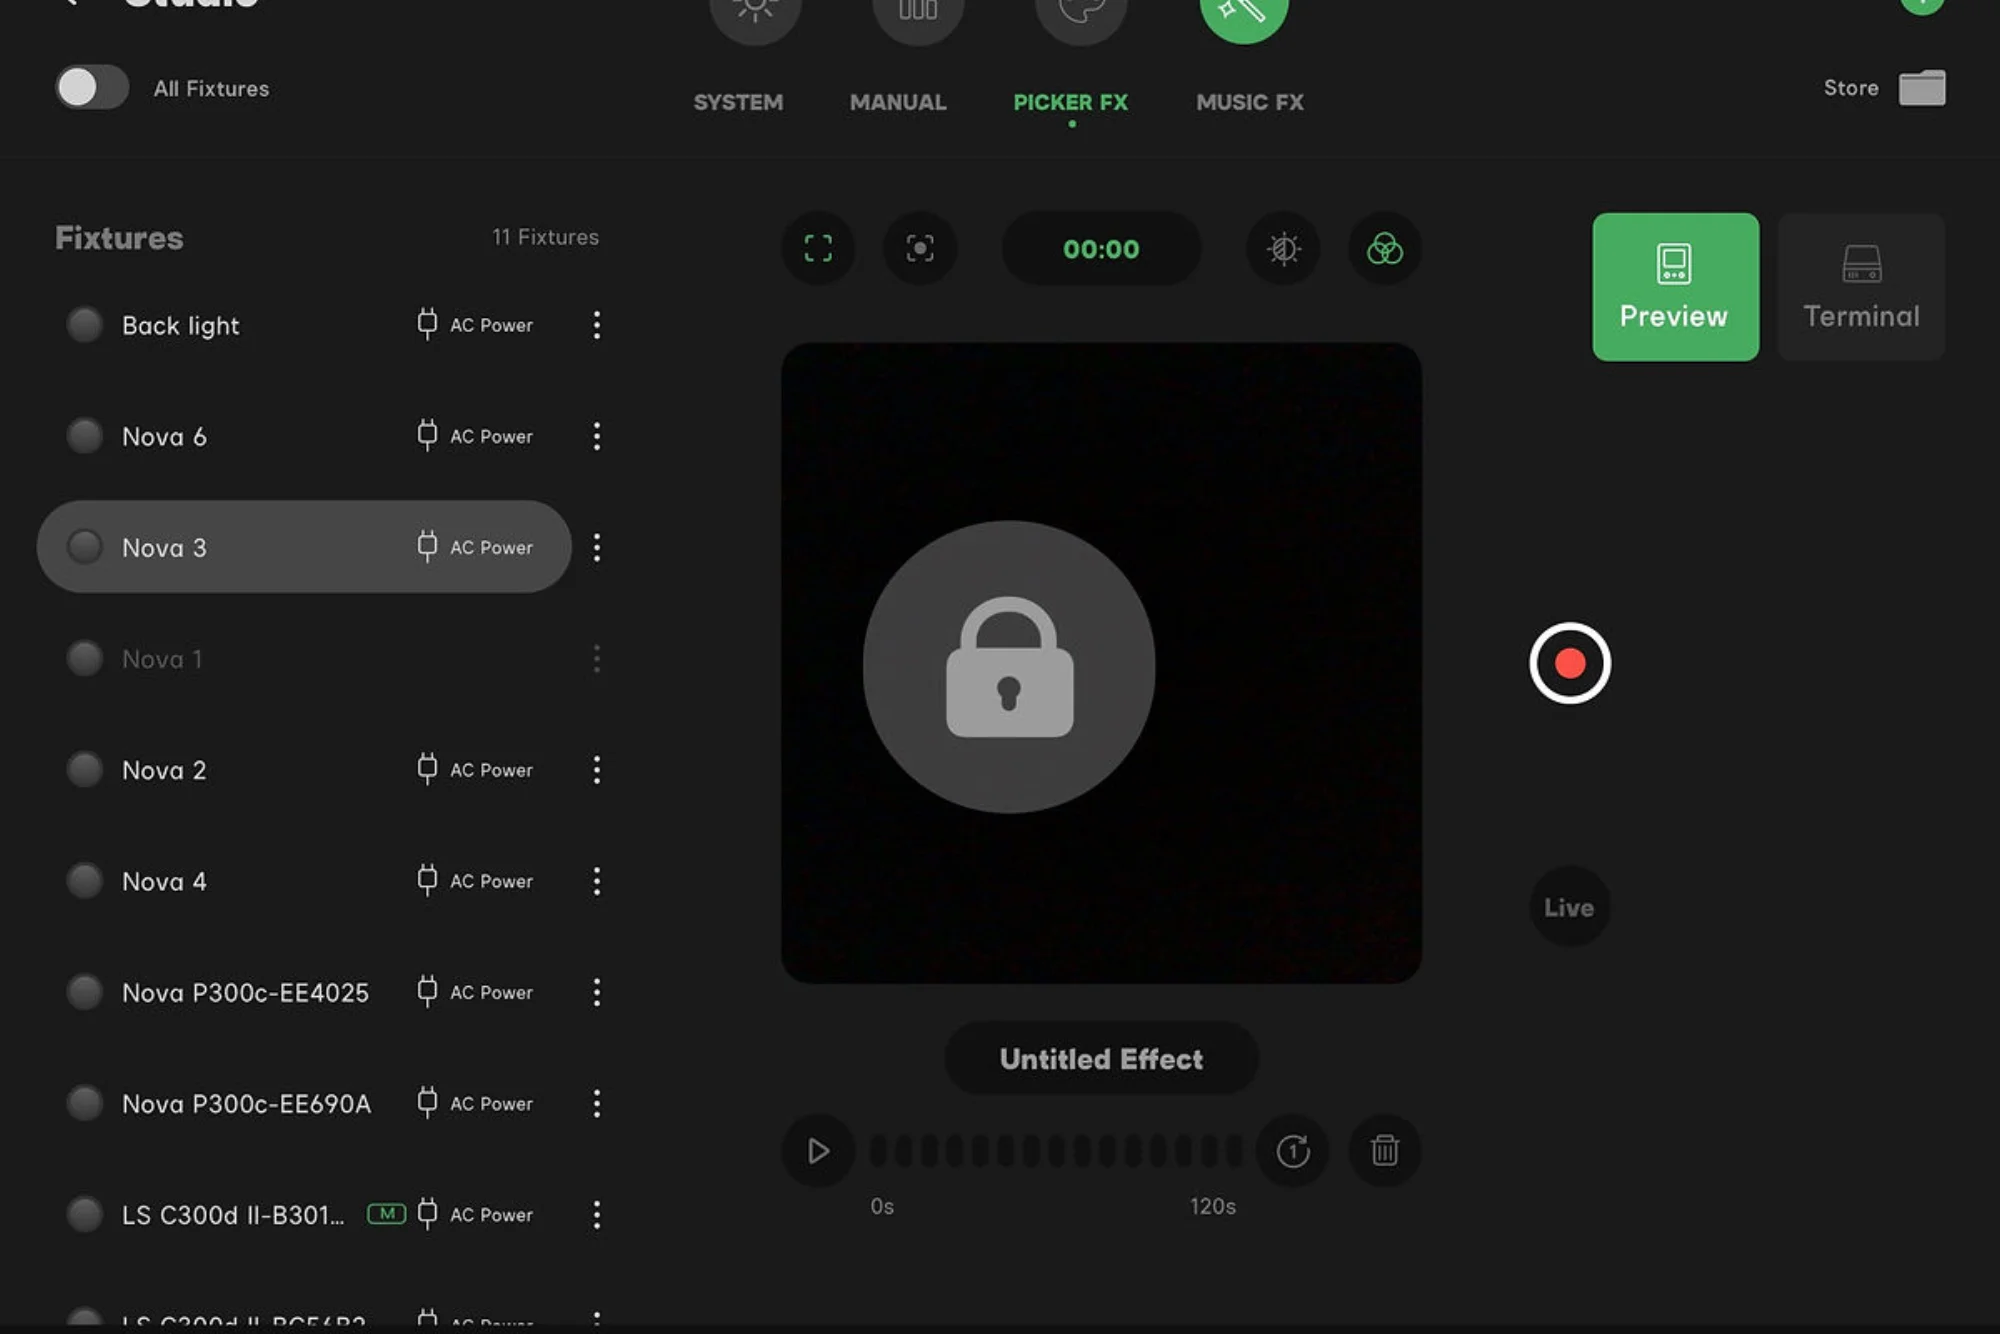
Picker FX: Unavailable in the free version. From what I’ve read, it seems to allow you to use your device’s camera to record a video of a certain real world lighting effect and apply it to your light.
Music FX: Also unavailable in the free version. Anyway, we continue to not have the pro version, but from what I’ve read about the music FX feature, it allows you to sync your lights to the rhythm of music, and allows you to adjust said lights to better fit your needs.
That’s it!
That’s the entire free version of the Sidus Link app. An intimidating, incredibly complex app that, my grievances aside, is actually really cool. There’s a lot of features, and they’re a lot less complicated than you might think.
Is it perfect? No. Do they need to learn how to write a manual that isn’t designed for vulcans and uses the correct tenses? Yes. But at the end of the day, it’s an incredibly strong and useful application, fantastic for filmmakers, and fantastic for Element 7.